Sunday, 31 August 2014

Memo stand


I remember one day of last month, my kid pulled a cork from a bottle and threw it away somewhere. The cork is quite big and I was thinking it might be a useful material for my future project and kept it.

One day,  my kid screamed at her dad : " Daddy always forget what I have said!" At that moment, an idea had struck me! A memo stand! I should make one so that my kids can clip on some mini memos on it to remind this forgetful daddy to get their things done!! Haha!

This is a simple project, you can finish it in an hour's time. Get the materials just around you and try it out.


Main materials:
1. small branch
2. felt pieces (dark green, light green)
3. a cork
4. wooden birds (or any hand sewn felt birds)
5. pegs


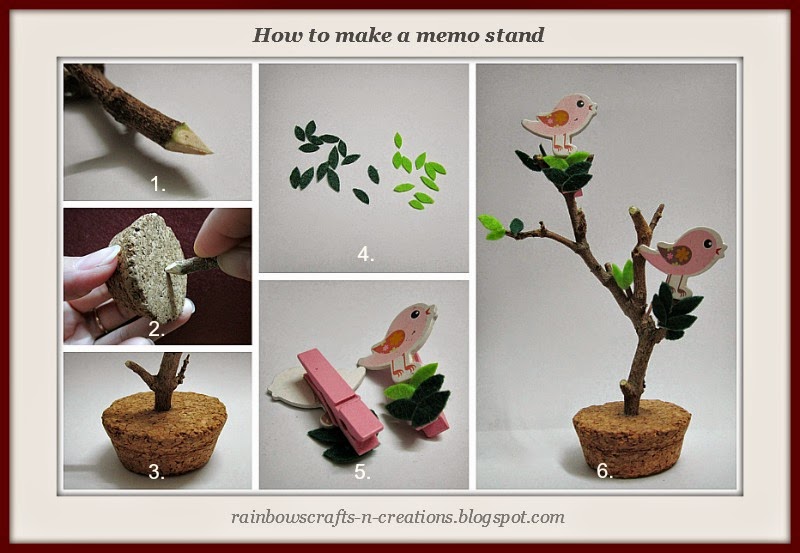
  1. Sharpen the foot of the branch.
  2. Put some adhesive glue or hot glue on the sharp point and insert it into the center of the cork.
  3. It is now looks like a tree planted on the ground.
  4. Cut out some leaves form the dark & light green felt pieces as shown in the photo.
  5. Glue the wooden birds on the tails of the pegs respectively, and then glue some leaves on the head of the pegs.
  6. Now, glue some leaves onto the branch. Don't glue the bird pegs onto the branch, you only need to clip it anywhere of the branch that you like. When you have memos to be attached on the branch, clip the memos with the wooden bird pegs. You can create more bird pegs with other materials when necessary. Done.


Monday, 25 August 2014

sock cupcake


It was a birthday of a special friend. I wished to give away two pairs of socks as a birthday gift . I was thinking and thinking......could I pack or wrap these two pairs of socks in a special way? Oh, no idea at all.  Usually, a birthday is inseparable from a cake. Finally, I decided to give away the two pairs of socks in a form of a cupcake. I turned them into a cupcake without cutting and sewing. The cupcake can also be turned back into socks without any structural damage.


materials
1. two pairs of socks (one pair of crew sock and one pair of no show sock )
2. different colors ball head pins
3. a decorative felt whipped cream


1. Fold the no show socks in half respectively. Put one of them on top of the other. Place them in a same direction as shown in the photo.

2. Roll up the socks carefully.

3. Once you come to the end, continue wrapping or rolling with one of the crew socks with the same method. Then pin it and set it aside.

4. Take the other crew sock and insert your both thumbs inside the top of the sock. Use your fingers to bundle it up to your thumbs until it is down to the bottom of the toe.

5. Pleat the sock evenly when you bundling it on your thumbs so that the pleats will set against the inner side of the top. It is now looks like a case or cup.

6. Put the sock roll that you made into the case.

7. Adjust the bottom of your cupcake by pulling some sock fabric out from the center and flatten it as shown in the photo.

8. Decorate your cupcake with ball head pins. Be careful that a blunt pin will harm the structure of the socks.

9. Place a felt whipped cream on the top center by inserting two pieces of ball pins through the button holes.

10. Done.


Caution:
This type of gift is not appropriate to give away for children. If you like this idea, you can hand baste where is necessary instead of using a sharp pin and use other appropriate decorative items to decorate your cupcake.


Saturday, 16 August 2014

felt strawberry


This is another lovely project with felt cloths. A deep red felt strawberry is seems very easy to create but must be patient in sewing the seeds ........It is quite time consuming to sew the seeds one by one. I had tried several ways to get my desired result.  I used a thin thread to sew the seeds a bit more closely; I used a thicker thread to sew the seeds sparsely and finally I used a thicker thread to sew the seeds closely ....... Haha, that was the result I wished to get! I was extremely happy! That is why I always say "Making handcrafts is an endless source of delight".


materials:
1. red and green felts
2. matching threads
3. yellow embroidery thread 
4. poly-fill material


1. Cut out a circle from a piece of red felt. Cut it into two semi-circles. Only one semi-circle is needed to make one strawberry.

2. Take one of the semi-circles and fold in half. Trim the straight raw edges by putting your scissor at about an angle of 80 degree from the folded edge to create a circular sector.

3. Look at the photo, this is a circular sector after trimming.

4. Fold the circular sector in half and sew the raw edge with backstitch or with sewing machine.

5. Then, turn the piece to the right side and sew a few small yellow dots(seeds) with running stitch.

6. Stuff up the piece with some poly-fill material. Run stitches all around the edge of the opening and pull the thread tightly to close it up. Make a few stitches across, knot and cut thread.

7. Cut out a piece of leaf from a piece of felt as shown in the photo and sew it on the top center of the strawberry.

8. Done.


Do you like to juggle ideas? You can try to turn this strawberry into a hanging ornament, a key chain or a decorative item for your other project.


Wednesday, 13 August 2014

Felt Whipped Cream


Are you searching any decorating tip for your felt cupcake? How about a felt whipped cream? You should try it out ......

A little felt whipped cream might be an awesome decorative item for a hand sewing felt cupcake or pie.


materials:
1. white felt
2. a red button
3. poly-fill material
4. matching thread


How to make a felt whipped cream

1. Draw two different size circles with one center point. The size of the big circle is twice as large as the small circle.

2. Cut out the circle and fold the circle in half three times to make eight equal parts.

3. Unfold the circle and trace the creases with a pen and ruler. This will identify eight equal parts.

4. Now, draw a curve from the intersect point to the top of the next line for each part.

5. Cut out the unwanted parts (the part where outside the curve in each part).

6. Place the paper pattern on a piece of felt. Hold them firmly together and cut the piece out follow the paper pattern.

7. Knot your thread. Insert the needle through a tip from front to back. Pull the thread through and continue for other tips. End your last stitch where you started.

8. Stuff up the piece with some poly-fill material before you close the opening completely.

9. Close the opening by pulling the thread tightly and make several stitches across. Sew a button or bead at the top center.  Don't cut the thread if you plan to sew it on your project. Just bring your thread to the bottom center.

10. It is done!!


Saturday, 9 August 2014

Easy Drop stitch fringed scarf


I wished to knit a scarf for myself ... I needed a simple and loose-knit scarf, what kind of  knitting pattern should I go for it? I asked myself and thought for a long time. I drew, I counted, I tried to knit it in a small sample... Finally, I decided to knit an easy drop stitch fringed scarf.

This scarf uses a different lengths of  horizontal drop stitch. It create a beautiful wavy and loose pattern.

For me, a scarf is a great way to add an interesting touch to an outfit. Let me make one now. 

Knitting abbreviations:
K    = knit
YO = yarn over once
YO2 = yarn over twice
YO3 = yarn over three times
YO4 = yarn over four times

Materials:
Yarn    : 100%  acrylic, weight 40g 
Needle : single-pointed needle (size 4.5mm)


Knitting pattern
Cast on 36 stitches ( or any multiple of 14 plus 8)
Row 1 - 3)  Knit 3 rows

【start pattern]

Row 4) K8  *YO, K1,YO2, K1, YO3, K1, YO4, K1, YO3, K1, YO2, K1, YO, K8* Repeat between ** until the end of the row.

Row 5)  Knit across and drop all the yarn-over stitches off the needle.

Row 6 - 7)  Knit two rows.

Row 8)  K1  *YO, K1,YO2, K1, YO3, K1, YO4, K1, YO3, K1, YO2, K1, YO, K8* Repeat between ** until the end of the row. ( this row will end with a K1 instead of K8.)

Row 9)  Knit across and drop all the yarn-over stitches off the needle.

Row 10 - 11)  Knit two rows.

Repeat from row 4 to row 11 until a required length of your scarf.

Last row ) Knit one row. (the scarf will end with another 3 rows of garter stitch) and cast off.


How to make a fringe


Now, I will show you how I make the fringe for the both ends of the scarf. This is a very simple knotted fringe. I am sure you can do it very well.
  1. Cut lengths of yarn to double the length of the required fringe. Add extra yarn for the knots. Here I use two strands of  yarn for every section of fringe. Now, fold the two strands of yarn in half.
  2. Insert the crochet hook through the edge of the knitting, catch the loops and draw them out.
  3. Catch all the ends of the fringing using your fingers and pull them out.
  4. Tighten the knot. Then continue to complete all sections of fringe. How many sections of fringe you are going to do? Try to calculate before you continue the next section. Here I make each section every four stitches.
  5. Divide every section of fringe in half, then knot each half of one together with half of the next fringe.
  6. A row of knotted fringe is finished. Continue your work at another end of the scarf.


A simple and nice drop stitch fringed scarf is finished. There are many ways to wear a scarf, try out and proclaim your personal style from now. Happy knitting!!