Friday, 30 October 2015

Dual Color Baby Booties


This is my another knitting pattern for baby booties. It will creates a very attractive garter stitch texture. I knitted these baby booties with double-yarn. This pattern calls for two skeins of yarn (pink & white), use a strand of each skein at the same time and you have to treat these two strands as if they were a single strand while knitting. It is very easy and fast to get it done.

If you are not interested in this granular look baby booties, you can try out another simple knitting pattern for baby booties.


Baby size : 4 - 6 months
Finished length : approx 4" (10cm)
Gauge : 6 rows = 1" ; 4 stitches = 1"  in garter stitch

materials:
1. two skeins of yarn in different colors (100%  acrylic, weight 40g )
2. a pair of straight needles size 7mm
3. yarn needle or tapestry needle
4. two small buttons

knitting abbreviations :
K - knit
Kfb - knit front and back
Kfb2 - knit front and back two times
SSK2 -  slip slip knit two times
SSK 3 - slip slip knit three times
K2tog2 - knit two together two times
K2tog3 - knit two together three times
YO - yarn over
sts -  stitches


 Knitting Pattern


 Right bootie
cast on 25 stitches
Row 1 : (wrong side ) : K all
Row 2 : (right side ) : K1, Kfb, K8, Kfb, K1, Kfb, K1, Kfb, K8, Kfb, K1 (30 sts)
Row 3 :  K all
Row 4  : K2, Kfb, K8, Kfb, K2, Kfb2, K2, Kfb, K8, Kfb, K2 (36 sts)
Rows 5 - 9 : K all
Row 10 :K12, SSK3,K2tog3, K12 (30)
Row 11 : K all
Row 12 : K11, SSK2, K2tog2, K11 (26)
Row 13 : K all
Row 14 : K7, knit next 2 sts, bind off 12sts, K6

Now, you have two sets of 7sts on your needle.

For the first set of 7 sts :-
Row 15 - 17  :  Knit 3 rows.
Bind off and cut yarn about 12" to sew with.
(Leave the second set of 7 sts on the left needle when you knit the first set of 7 sts)

For the second set of 7 sts :-
Rejoin yarn at where you started binding off the 12 sts and cast on 9 sts tightly.
Row 15  :  K all sts
Row 16  :  K to last 3 sts. YO, K2tog, K1 (buttonhole)
Row 17  :  K all 7 sts
Bind off and cut yarn.


Left bootie
Rows 1 - 14  :  same as right bootie

For the first set of 7 sts :-
Row 15  :  K7, turn work, cast on 9 sts tightly
Row 16  :  K all
Row 17  :  K to last 3 sts. YO, K2tog, K1 (buttonhole)
Bind off and cut yarn about 12" to sew with.
(Leave the second set of 7 sts on the left needle when you knit the first set of 7 sts)


For the second set of 7 sts :-
Rejoin yarn at where you started binding off the 12 sts.
Row 15 - 17  : Knit three rows.
Bind off and cut yarn.


Finishing : Fold bootie with wrong side together and using the method of sewing invisible seam for garter stitch to sew up the heel seam. Then continue sewing the cast on edges (bottom edges) together with the whipstitch. Weave in yarn ends. Sew button opposite buttonhole on strap.

Note: attach button or any decorative accessories securely to avoid choking.


Monday, 19 October 2015

Colorful Yarn Pompom


I can still remember that when I was a child, my mum made me a few colorful pompoms that pleased me so much. Of course, my mum taught me how to make a simple pompom. The method used by my mum was the"two circles" method where you have to keep poking the yarn through the hole in the center.

The "two circles" method is very time consuming, especially when you are trying to make a larger pompom. Well, I am going to show you how to make a larger pompom with an alternative method. This method will requires 4 pieces of arch-shaped cardboard and you do not need to poke the yarn through the center hole.


Materials :
1. Four balls of yarn in different colors                 
2. Cardboard
3. Binder clips


How to make a colorful pompom  


click here to get the pompom template

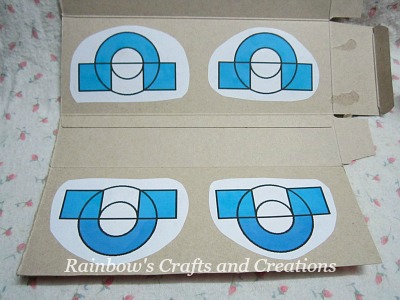
Before we start making a pompom, we need a pompom maker. You can make your own pompom maker with cardboard. The cardboard can be a toothpaste box, cereal box and etc.  The picture shown is the pompom maker template, it consists of  four arch-shaped pieces. The ratio of the outer circle to the inner circle is 2 : 1. Anyway, you can draw your own template in different ratio for certain purposes. If you do not want to make your own template, just click on the picture to get the template for your personal uses.


Print out the template on a piece of paper. Simply cut out the pattern pieces and glue them on a piece of cardboard.


Once the glue is dry, cut out the shaded area of each pattern piece. Then bend along the horizontal/straight  lines as shown in the photo.


Pick up two arch-shaped cardboard pieces and hold them together.


Wind the semi-circle closely with four strands of yarn in different colors. Keeping the winding even and not leaving gaps. Continue until the semi-circle in the middle of the arch-shaped cardboard is filled up with yarn.


Pick up the other two arch-shaped cardboard and make another bundle of yarn. You should now have two bundles of yarn as shown in the photo.


Put the two bundles of yarn together to form a full circle.


Hold the two halves together with four binder clips as shown in the photo.


Slide the scissors between the two layers of cardboard and cut open the wound yarn around the outer edge.


Draw a long piece of yarn between the two layers of cardboard. Pull the yarn tight and tie a firm knot.


Take off the binder clips and cardboard. The look of the pompom will looks like this.


Trim the pompom with scissors until it is perfectly round.


Tuesday, 15 September 2015

Layered Lace Flower Hair Elastic


I was in the mood for a big layered lace flower hair elastic... I got bored with my monotonous hair style and I wished to style my long hair with a vintage charm. An inspiration shot into my mind when I was looking at those old style laces that kept in the bottom of a box. Normally, we will need wider lace ribbons to make a larger layered lace flower. A larger lace might cost you a pretty penny, what if you wish to make a larger  layered lace flower with a diameter up to 3.5 inches by using a one inch and 0.5 inch wide lace ribbons? Yes, I will show you how to make a lace flower hair elastic with a budget-friendly method. You will find that crafting can be affordable, friendly and fun.


Materials:
1. Two lengths of one inch wide lace ribbon, 18 inches and 13 inches long respectively.
2. A length of lace in different color/shade, 0.5 inch wide and 8 inches long
3. An embellished fabric-button
4. A piece of elastic
5. Felt cloth
6. Matching thread (match to the felt cloth)
7. Hot glue


Thread the needle. The length of the thread should be about twice the length of the lace. Sew a running stitch all the way along the edge evenly. Remember to leave an enough tail of thread at the starting and ending point for gathering purposes. Then, gently pull the tails at the both sides to gather the lace until the length of the lace is about 5 inches. Tie a knot a the back of the lace with the two tails to form a circle. Be careful when you tie the knot, don't  shorten the length of the gathered lace. The diameter of the circle should be about 1.5 inches. Then arrange the pleats evenly with your fingers.


By using the same method, make the second lace flower with the lace that measures 13 inches long. This is the smaller flower, so the diameter of the second flower is about 1 inch. After that, make the smallest lace flower with the lace which is in different size and color/shade. The diameter should be about 0.5 inch. Now you have 3 lace flowers of different sizes.


Draw two circles in different sizes onto a piece of felt cloth and cut them out. The diameter of the big and small circle are 2 inches and 0.8 inch respectively.


Pin the biggest lace flower onto the big felt circle. Sew the lace flower in place along the edge of the circle with the matching thread because the stitches will be less likely to stand out at the back. The photos shown above are the front and back of the biggest lace flower that sewn on the felt circle.


Sew the other two lace flowers in place one by one as shown in the photos. Then, attach the embellished fabric-button at the center by using hot glue or sew it in place by hand stitching.


Sew the elastic at the back and hot glue the small circle over the stitches for a neat finish. Done. Now, you can put your hair in a ponytail or bun with this vintage fashion accessory.


Sunday, 6 September 2015

Lace Flower Brooch


Are you finding inspiration for your lace brooch project? I'm going to show you  how to make a fancy lace brooch out of lace and fabric-covered button. I believe this noticeable feminine piece will add interest to your ensemble.


Materials:
1. One piece of fabric-covered button
2. A length of lace
3. Safety pin
4. Felt cloth
5. Matching thread
6. Hot glue


Cut the lace to an appropriate length. The length of the lace that I use in this project is approx. 17" and the width is approx. 1". Thread the needle. The length of the thread should be about twice the length of the lace. Then, sew a running stitch all the way along the edge evenly. Remember to leave an enough tail of thread at the starting and ending point for gathering purposes.


Gently pull the thread at the both sides to gather the lace. Pull the thread completely, this will create a heavy ruffle and you can see the lace flower is taking shape.


Pull the thread very tight and make a couple of knots with the tails of thread at the back. The lace flower is done.


Now, attach the fabric-covered button on the center of the lace flower by hand stitching or hot glue the button in place. I embellished the fabric-covered button with a sequin and a bead before I sewed it down. You can use any embellished button or other embellishments instead of a fabric-covered button.


Draw two circles in different sizes onto a piece of felt cloth and cut them out. The sizes of the circles are determined by the size of the chosen safety pin.


Attach the big felt circle onto the back of the lace flower, you can either sew it in place or attach it in place with hot glue.


Sew the safety pin in place as shown in the photo.


Attach the small felt circle over the stitches for a neat finish and it is ready to pin on your outfits, bags, scarves, hats and etc...


Saturday, 29 August 2015

How to Make a Fabric-covered Button Without Kit


Before you start making the fabric-covered buttons, you have to choose the right scraps of fabric. Not every fabric suitable for doing a nice and neat fabric-covered button especially when you make the button without a kit. For example, fabric that tend to fray is unsuitable, but a little fraying is acceptable in thin fabric because you can leave a larger seam allowance and it will not form a bulky knot at the back. Instead, a very thick fabric would create an inordinately large and thick button and it will form a bulky knot at the back. Usually, I will use button with or without shank at the back to make fabric-covered buttons. No matter what kind of buttons you are using, the steps of doing a fabric-covered button almost the same. Today, I'm going to show you how I make a fabric-covered button with the shank button and the button without shank.


How to make a fabric-covered button with shank button.


materials:
1. a shank button (no holes on top)
2. scrap of fabric
3. Matching thread

Measure the diameter of the button. Double the diameter of the button and draw a circle onto the scrap of  fabric. If the button is domed, add more extra millimeters to the diameter. Anyway, a very accurate measurement is not necessary. You can use something round to trace a circle with, as long as the diameter of the chosen tool is within your required measurement.


Trace a circle onto the fabric, then cut it out. Thread the needle with double thread, knot the end of the thread and sew along the raw edge with the smallish running stitch.


Place the button upside down on the wrong side of the stitched piece of fabric and the button should be put in the middle. Pull the thread to gather the fabric to form a small fabric sack. Then, use your fingers to pull and arrange the pleats evenly.


Continue pulling the thread until the fabric snuggle up to the button. Then turn the raw edge inwards with the needle tip, press with your thumb and pull the thread tight. Keep on turning the raw edge and pulling the thread tight until the end of the round.


Pass the needle through the pleats along the turned edge. Pick up several pleats every stitching. Pull the thread very tight after every stitching and make sure the shank of the button is not covered by the fabric. Sew one round, tighten up the opening by pulling the thread fully and knot off your thread.


The photo shown above is the back and front look of the fabric-covered button with shank. Since the shank is not covered, it can be used when you sew the button on.


How to make a fabric-covered button with the button without shank


materials:
1. a button without shank
2. scrap of fabric
3. Matching thread


The steps of making a fabric-covered button with the button without shank is almost the same as as you made the fabric-covered button with shank at the back. You have to sew the raw edge with the smallish running stitch, put the button on the fabric, gather the fabric, turn the raw edge inwards and pass the needle through the pleats to reinforce the fabric seam. The only different step is to close the opening completely.


This is the finished button. You would find that the button with or without shank at the back will give you the same outcome on the front side.


You can embellish your fabric-covered button with any decorative item. The above photo is showing an embellished fabric-covered button, I hot glued a sequin and a bead onto the center of the button to give it a different look.


Sunset at the Contryside


Sometimes, I like to give myself a relaxing holiday away from the bustle of town and stay in the countryside for a few days. I like to go to this paddy field every time I am there, here I enjoy the peaceful, quiet and modest scenery... especially the sunset.  Apart from the beach, have you ever enjoyed the awe-inspiring sunset in any greenish paddy field? Why not have a try if you have a chance? It might give you another feeling of relaxation.

 I remember, on this infinite paddy field, I enjoyed an amazing sunset last year. The sun looked like a giant egg yolk, it tinted the sky orange,then mingled with scarlet... how pretty that hues was! it moved slowly until it dipped itself beneath the skyline. I enjoyed the twilight  moments...The dusk crept over from the east...


Friday, 21 August 2015

Mini Tote Bag With Lining


materials:
1. Two pieces of 8"x 13" main fabric
2. One piece of 10.5" x 13" main fabric (contrasting color)
3. One piece of 24.5"x 13" lining fabric
4.  a piece of 9.5" x 13" sponge (approx. 1/8" thick)
5. two pieces of 3" x 16" strips (for handle)
6. appliques (optional)

* The measurements of the above mentioned pieces are included seam allowances.
* If you like the puppy applique, click here to get the free template.


1. First, you have to join the three pieces of main fabrics together with the contrasting color arranged in the middle. Make sure the edges with the same length is aligned together. Then, sew a 0.5" seam. Now you have a rectangular piece.


2. Turn the fabric to the wrong side. Place the sponge on the middle part and baste around the edges.


3. Turn the fabric piece to the right side and top-stitch the left and right diagonal lines on the middle part as shown in the photo.


4. Arrange and sew your appliques in place. This is optional, you can just leave it blank.


5. Fold the rectangular fabric piece in half with right side together. Sew along the long sides with a 0.5" seam.

6.  Now, sew the base for the bag. Flatten the corner of the bag, so the side seam is flatted against the bottom of your bag to form a triangle. Draw a straight line about 2" from the point of the corner and perpendicular to the seam. Sew along the straight line as shown in the photo.

7. Draw a straight line on either side of the seam. The line should start from the end of the horizontal line that you sewed and parallel to the seam.


8. Fold the fabric follow the straight line and sew a 0.125" (1/8") seam.


9. Cut off the corner of the bag, leaving a 0.5'' seam allowance. Repeat the step 6 to 9 for the other corner.


10. The mini tote bag is taking shape. Set it aside.


11. Now is the time to make a lining to the bag. Fold the lining fabric in half with right side together and sew along the long sides with a 0.5" seam. Then sew the base as you sewed the main body of the bag. Don't turn the bag lining inside out, just leave it as it is and set it aside.

12. Take the main body bag and draw two straight lines on the right side of the top edge. The first line is 0.5" from the edge and the second line is 0.75" (3/4") from the edge. Then press with iron to get two crease lines on the top edge. After that, insert the lining into the main body bag with wrong sides together.

13. Align the top edges properly and pin the edges together.

14. Simply sew a line on the top to secure the layers.


15. Fold the top edge twice by following the two crease lines that you made and pin. Then, sew a 0.125" (1/8") seam along the folded edge on the wrong side of the tote bag. So, the hem width is 0.625".


16. The opening of the bag is done.


17. We are going to make the strap (handle) of the bag. Take the 3" x 16" strip and fold it in half lengthwise with the wrong side out and sew a 0.5" seam. Press the seam against the opposite side so the seam is set at the middle and then sew a 0.75"(3/4") seam along one of the short edge. Repeat the steps to make the other strap.

18. Turn the strap right side out. Fold the ends (opening) inwards before you sew the straps to the bag.


19. Pin each strap on the appropriate point of the top opening and top-stitch a "X-box" for each end of the strap.


20. A new mini tote bag is born!!


Related Posts Plugin for WordPress, Blogger...