Tuesday, 31 March 2015

How to Knit the Double-Loop Stitch


How to knit a piece of denser fabric of loops? By using the method that I shared on my previous post - fur stitch, is not dense enough. In fact, I could go with double yarn to double the number of loops but I did not want to do so because it requires two balls of yarn to be ran at the same time and I did not want the two balls of yarn become remainders after a small project. I had been trying out some of the double-loop knitting methods that I found from the internet but could not satisfy my need. The methods that I tried out are able to create a denser loopy fabric but one of the loops of a stitch will get lose when you pull the other loop that created at the same stitch. What I need is a fabric that looks denser and rich but every loop must be securely knitted in place. It had been hard to get a solution  ... Anyway I did not give up and I got my way to create a piece of denser fabric of loops with my own double-loop knitting method at last.


Instruction:

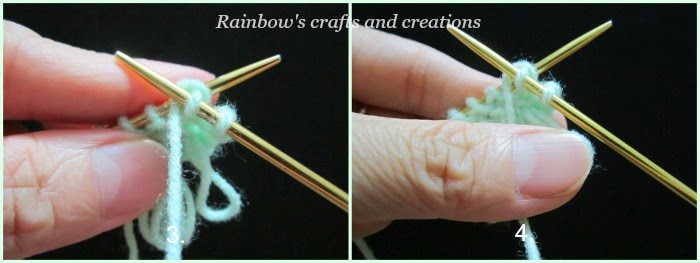
Knit into your desired stitch but do not drop the stitch of your left needle. Bring the working yarn to the front between the two needles and place your thumb on the working yarn. Then, wrap the yarn around your thumb and bring the yarn to the back between the two needles.


Keeping your thumb in the loop and insert your right needle into the same stitch and knit. Once again, do not drop the stitch of your left needle. Then, bring the yarn to the front between the two needles.


Place your thumb on the working yarn and wrap the yarn around your thumb to make the second loop. Then, bring the yarn to the back between the two needles again. Keeping your thumb in the loop and insert your right needle into the same stitch and knit it as usual, this means you can now drop the stitch of you left needle. Now, you have three new stitches and two loops on your right needle.  


Pick up the the second last stitch from the right needle tip and then pass it over the last stitch from the right needle tip. This means one stitch is bound off and the second loop that you made previously is locked and secured in place.


Again, pick up the the second last stitch from the right needle tip and then pass it over the last stitch from the right needle tip. One stitch is bound off and the first loop that you made previously is locked and secured in place too. Photo no.15 shown is a finished double-loop stitch.


If you continue your double-loop knitting to the end of the row, you will get a row of double-loop stitches as shown in the photo above.


Saturday, 28 March 2015

How to Knit the Loop Stitch / Fur Stitch


Loop stitch also known as fur stitch. It creates a fluffy and soft fabric. You can use this method for your household furnishing projects such as rugs and sofa covers, you can also use it to make loopy knitted animals or you can even use it to add textured loops instead of fridge on the both ends of a scarf.

There are several knitting methods and variations for making the loops. I am going to share with you the method that I think it is easier to work with.

You can start to knit the loop stitch at your desired row and stitch or you can make the loops on the wrong side and the right side so that you get loops on the both sides. By referring to the photos below, you will find that I start to knit another row of loop stitches from the second stitch on the left needle.


Instruction:

Knit into your desired stitch but do not drop the stitch of your left needle.


Bring the working yarn to the front between the two needles and then place your thumb on the working yarn.


Wrap the yarn around your thumb and bring the yarn to the back between the two needles. Keeping your thumb in the loop and insert your right needle into the same stitch.


After that, knit it as usual so you can drop the stitch of your left needle. Now, you have two new stitches and a loop on your right needle. Pick up the first stitch ( the second last stitch from the right needle tip) and pass it over the second stitch ( the last stitch from the right needle tip).


Photo no. 10 shown is a loop stitch that I have just finished and photo no. 11 shown is two rows of loop stitches.


Note :
If you are using thick yarn, I suggest you to make the loops on every other stitch. With this method you will get a smoother and neater surface for your knitting projects.


Tuesday, 17 March 2015

Little Blocks Scarf

This scarf is my daughter's first knitting project. Since she was a beginner, I suggested that she started with a simple project. Making a scarf was a good choice.

This scarf is mainly made up of alternating blocks of stocking stitch and reverse stocking stitch that created in a combination of 4 stitches and 6 rows to each block. While, the both ends of the scarf are made by simple rib stitch. Combining simple rib with little blocks would create an interesting knitting pattern, we especially love a long ribbing at both ends of the scarf.

Simple ribs are made up of knit and purl stitches that form verticals. For this scarf, we start the pattern with some rows of Knit-three and Purl-three rib, then continue with the pattern of little blocks until you reach the desired length and again make another rows of Knit-three, Purl-three rib for the other end.


Knitting abbreviations:
K = knit
P  = purl

Materials:
Yarn    : 100%  acrylic, weight 40g 
Needle : single-pointed needle (size 4mm or 4.5mm)


Knitting Pattern :

cast on 108 stitches

[ part one : ribbing ]
1. front row - K3, *( P3, K3), *repeat to the end
2. back row - P3, *(K3, P3), *repeat to the end
Repeat from step 1 to step 2 until you reach a length of 20 rows.

[ part two : start little blocks pattern ]
3. front row - K4, *(P4, K4), *repeat to the end
4. back row - P4, *(K4, P4), *repeat to the end
Repeat from step 3 to step 4 three times so you will get a 4 stitches with 6 rows little blocks. 

5. front row - P4, *(K4, P4), *repeat to the end.
6. back row - K4, *(P4, K4), *repeat to the end 
 Repeat from step 5 to step 6 three times so you will get a 4 stitches with 6 rows little block.

Now you can see a pattern of alternating blocks of stocking stitch and reverse stocking stitch. Repeat from step 3 to step 6 until your desired length.

[ part three : ribbing ]
7. front row - K3, *( P3, K3), *repeat to the end
8. back row - P3, *(K3, P3), *repeat to the end
Repeat from step 7 to step 8 until you reach a length of 20 rows. This part exactly the same with part one.

9. Bind off and weave in ends.


Friday, 13 March 2015

Hanging Hand Towel


I bought many kitchen towels during a big sale at Tesco about a year ago. One day in last week, I found that I lack of  hanging hand towels. Since I don't want to leave too many kitchen towels in my kitchen cabinet, I tried to turn some of them into hanging hand towels.

I urgently needed it, thus I used a very simple method to get it done. This method is very easy and you can finish it in less than 10 minutes.


materials:
1. A piece of kitchen towel
2. Ribbon (13cm - 15cm long with 1.5cm wide)
3. Two pieces of two-hole buttons (the diameter of the buttons should be bigger than the width of the ribbon)
4. Matching thread


 First, make a 1 cm fold towards the wrong side at the both ends of the ribbon and press.


Then, sandwich one of the corner of the towel between the both ends of the ribbon at a 45 degree angle.  


 Sew the ribbon in place as shown in the photo.


Don't cut off the thread, use the same thread and needle to sew the two buttons on the both ends of the ribbon with the "in one-step" method. Place one button at the front and the other at the back of the towel. The two buttons should be placed at the some point and aligned properly so you can insert the needle through the holes at once. This way the two buttons will be sewn in place at the same time.


Repeat the sewing process enough times to make sure the two buttons are securely in place.


Now, make a knot close to the hole where the thread came up. To do this, you have to insert the needle under a few stitches that you made just now and close to the thread, then wrap the thread around the needle tip twice. Pull your needle through until the wrapped region get to the end of the thread and tighten.


A knot is completed and close to the button hole. To hide the knot inside the hole, you have to insert the needle back to the same hole and pull the thread through at the other side of the work until the knot is hidden inside the hold and cut the thread off.


A simple and lovely hanging hand towel is done.


Sunday, 15 February 2015

Happy Chinese New Year 2015

Chinese New Year 2015 took place on 19/2/2015. This year is the year of the goat by the Chinese calender. This is one of the most important festivals in Chinese culture. It is not only represents the start of a new year but also referred to as a joyous occasion for family reunions. To me, It is also a festival to relive cultural tradition ...

You can see streets,houses, shops, or shopping malls are permeated with festive atmosphere, feeling the warmth and optimism of a new year. Let's welcome new beginnings!!


Golden Goat and a large number of red lanterns in Pavilion, Kuala Lumpur.

What a wonderful lantern tree!!


Spring couplets calligraphy contest as a part of the Chinese New Year celebration. My daughter and I took part in the contest at her school. Haha, quite a long time I didn't write in Chinese calligraphy! Anyway we enjoyed this festival activity.


Red is an auspicious color in Chinese culture, it symbolizes good fortune and joy. Thus, I tried to dress up some of my potted plants with red ribbon yesterday... I also put up a Chinese New Year tree at the corner of the staircase.

One of my decorative potted plants - Water Jasmine.
                                       
My Chinese New Year tree.


May the year of the goat bring prosperity, success and joy to you...


Monday, 2 February 2015

Lace-Trimmed Rectangular Tablecloth


Sewing your own lace-trimmed tablecloth is an inexpensive way to dress up your table and it is very easy to make. Normally, you shouldn't take more than one hour to complete a piece of lace-trimmed tablecloth if you use the sewing machine.

Today, I will show you how I sew a lace-trimmed tablecloth with a very simple method. I will use my veteran sewing machine to start my work......

Materials:
1. cotton fabric
2. Matching thread
3. lace


Instruction:

1. To find out the measurement of a rectangular tablecloth, measure the size of your table itself and add 10 inches of additional drop to all the four sides ( included 1/2 inch seam allowance). You can change the additional drop lengths according to your preference.

2. Make sure you have purchased enough lace with a margin for error and pleats before you start your work. This pattern requires three pleats only at the corners of the tablecloth and therefore leave a margin of 16 inches is enough. For example: if the perimeter of your tablecloth is 240 inches, plus a margin of 16 inches, so the length of the lace that you need should not be less than 256 inches.

 3. Now, we are going to start the work. Cut out the fabric piece according to the final measurement.  Fold the raw edge 1/4 inch and press, and then make another fold 1/4 inch so you have a doubled over layer of fabric along the edge. This will keep the edge from fraying.

4. Place/pin the folded edge on the right position of the lace and sew a 1/8 inch (about 2mm) seam down along the folded edge as shown in the photo below - place the fabric and lace right side up under the presser foot of the sewing machine.

Sew a 1/8 inch seam along the folded edge of the fabric.


 5. Pleat the lace near each corner of the folded edges. Pleat and hold the lace in place with a long needle. I didn't pin or baste across the pleats in advance. I lift the presser foot when I reach the part near to the corner, then push and gather the lace which lay under the fabric towards the back of the presser foot  to create pleats - make a pleat before the right angle and make a diagonal pleat right on the right angle to align the corner (don't lift the needle when you lift the presser foot). Then lower the presser foot and continue sewing a 1/8 inch seam down the edge which mean you sew across the pleats at the same time. Now, lift the presser foot (don't lift the needle) and turn the fabric to the other side, make the third pleat after the right corner. Try to pleat the lace evenly. Then continue sewing a 1/8 inch seam down along the folded edge to next corner. Follow the same method to get your work done.

Pleat the lace.

Make three pleats at the corner of the tablecloth.


Monday, 26 January 2015

Garter Vertical Striped Scarf

Add a touch of glamour to my outfit...
I knitted a vertical striped scarf with different shades of grey recently. Do you think that people wearing grey scarf might look more depressing? To me, I love scarf in pure grey or mixed of different shades of grey because it would be my perfect choice to match almost all my casual shirts and dresses.

I believe any scarf would be fashionable and stunning if we make a right match for our clothes or the shades that we choose tone in well with the whole outfit. Thus, not only the bright and colorful scarf but also the dark shades scarf would enhance our look and draw compliments from our friends.

If you don't want to hunt around looking for a perfect scarf to match your clothes, you can now try to knit one with your perfectly matched colors. This is a garter vertical striped scarf. To get the method of making a garter vertical striped you can refer to my previous posts - cast on two colors and Intarsia colors change on vertical line for garter stitch.


In the middle of the work......
Materials:
Yarn    : 100%  acrylic, weight 40g 
Needle : single-pointed needle (size 4.5mm) 

Pattern for this scarf :
1. Cast on  39 stitches with  "long-tail cast on" - 13 stitches for each shade of grey.
2. Knit every row ( be careful when you change colors at the right side and wrong side of your work because this is a non-reversible pattern).
3. Knit to a desired length and cast off.
4. Add fringes to the both ends of the scarf. I use one strand of yarn for each stitch and the three shades of grey will be used alternately.
Now, cut a length of yarn according to your need and then fold the strand in half. Insert the crochet hook through the edge of the knitting, catch the loop and draw it out,then grab the both ends of the fringing using your fingers and pull them out through the loop. Continue your work for the other stitches on the edges.

( click here to find out the method of making a knotted fridge).


Related Posts Plugin for WordPress, Blogger...